Switching domains will have an effect on search engine rankings but if done correctly, it will be temporary in nature. So here is a complete step by step guide to properly move a XenForo forum from an olddomain.com to newdomain.com
If you wish to move a XenForo setup to a new host check it out here.


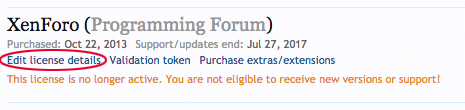
Step 1: Change XenForo License
Each XenForo license is associated with a domain or subdomain. The first step is to change the license url from XenForo’s customer area. One can change license url for an active as well as expired license.

Step 2: Assign new domain to the host
The next step is to host the new domain with the current web host. The process will vary from host to host but the outline remains the same which is to change the domain’s nameserver to the one provided by the host and then add the domain to the host’s control panel.
When you add the domain, take a note of domain’s root folder. We will move the files here.
Step 3: Move Files
If both the domains are in the same CPanel account, one can move files using the CPanel’s file manager to drag and drop files from one folder to another.
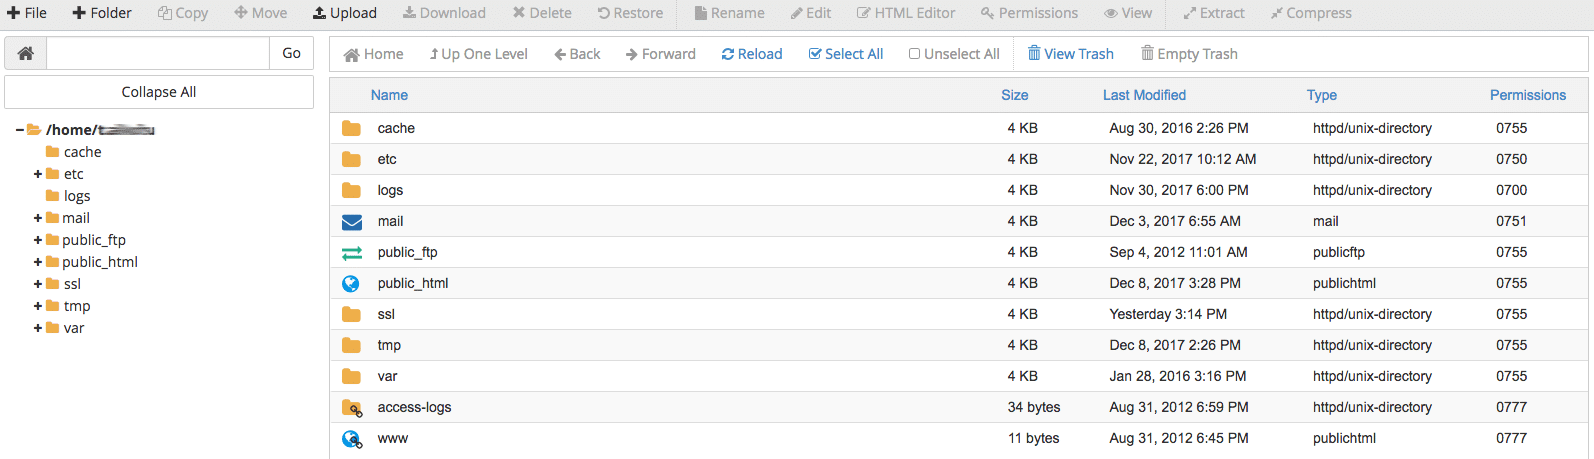

If the domains are on a separate CPanel account, one may need to compress the public_html (or its equivalent folder in the control panel) folder and download the zip file. Then use the upload manager in the new control panel to upload it. Once uploaded, it can be Unzip using the extract option.
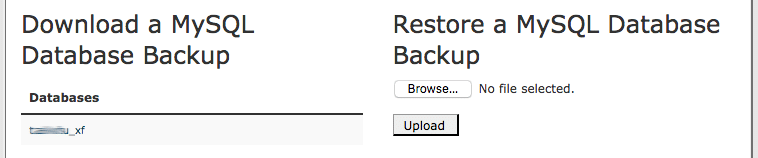
Step 4: Move Database
If the new domain is in the same CPanel account, there is no need to move the database. The new domain can connect to the same database.
If there is a change in the CPanel account, backup the database from the old CPanel. The option to backup a database is under Files > Backup.

When backing up a database remember to close the XenForo forum on the old domain so user registration, newly posted threads and posts created after the backup aren’t lost.
Restore the database in the new CPanel account using the “Restore a MySQL Database Backup” option.
The restore can be done on an already existing database but it is recommended to have a new one. Refer how to create databases.
If the size of the database is big, you may want to be doing a backup and restore of the database using the SSH shell access.
Step 5: Edit Config.php
If you are using the same CPanel account, the database details will remain the same. So you don’t need to edit the config file.
If you are switching CPanel account, the last step is to connect the new database to XenForo. This can be done by changing the new database access details obtained in step 4 to the config.php file.
Step 6: Redirect Old Domain to New Domain
Browse XenForo forum on the new domain. If everything looks perfect, it is time to redirect old domain to the new domain so you don’t lose the SEO benefits of the old domain.
Add the following lines to the old domain’s .htaccess file
This should redirect all the traffic from old domain to the new domain.
Step 7: Change XenForo settings
Settings changes to be done in XenForo admin area.
- Options – Admin > Options > Basic Board Information and change Board URL as well as homepage url and other URLs (contact, terms etc). Change the contact email address and default email address to reflect the new domain.
- Google Analytics – Add a new domain in Google analytics and then change the “Google Analytics Web Property ID” under Admin > Options > Statistics and Metrics.
- Logo path – If you are changing the domain, it is highly likely that you want to change the logo as well. Upload the new logo via FTP and put the new logo path in Admin > Styles & Templates > Style Properties > YOUR STYLE > Header and Navigation.
Once the setting changes are done, regenerate the XML sitemap under Admin > Tools > Rebuild Caches > Rebuild XML Sitemap.
TIP: If you have any page nodes that contain HTML, and have URLs or images referencing to the old domain, edit the HTML to point URLs to the new domain. Keeping them as old URLs will have no impact and users will be redirected from the old domain to the new domain but with an extra redirect.
Once sitemap rebuild is complete, update Google webmaster tool for a change of address for the old domain.
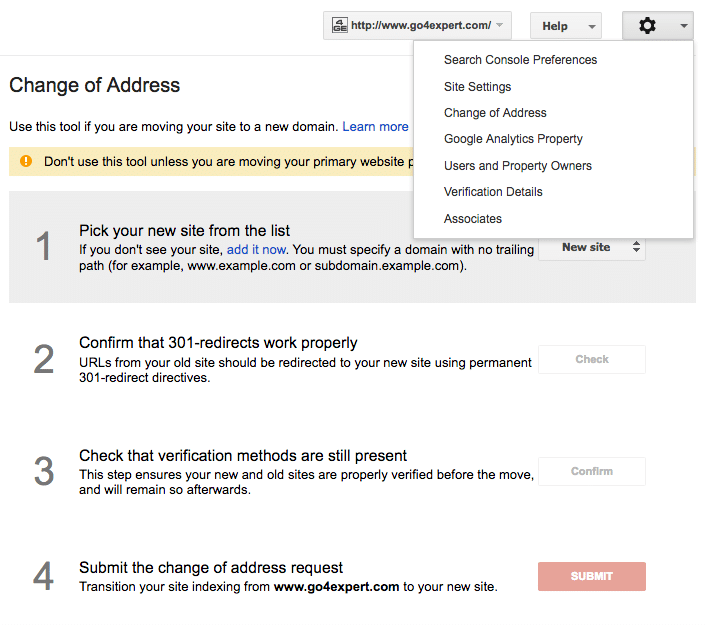

To change the address in Google webmaster tool, you will need to add the new domain to a separate property and then select it as a new site for the old property.
Step 8: Change URLs inside the post content
The last and final step is to change the URLs inside the post content. We will use Post Content Find / Replace. A guide on how you can install the plugin is here.
The plugin adds an option under Admin > Tools > Replace In Posts.
- In quickfind use: olddomain.com
- In Regular expression use: #olddomain\.com#siU
- In Replacement String use: newdomain.com
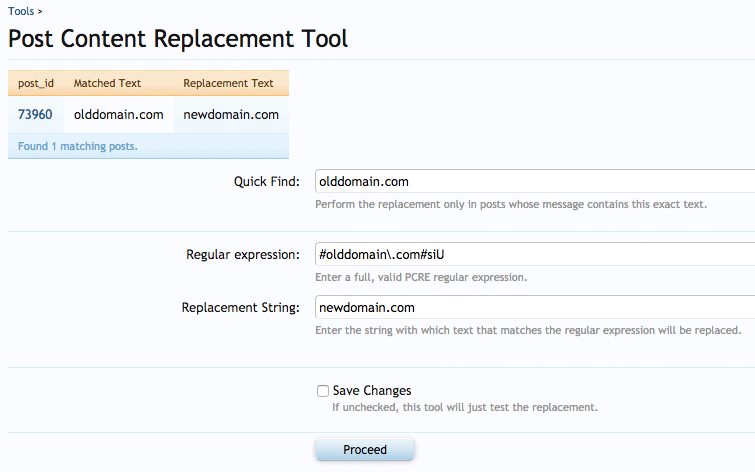

Do not tick save changes to do a dry run. Once things look as expected, tick “Save Changes” to save the changes in the database. This should change all the reference to the old domain in each post to the new domain.